Guides 19 min read
AI-Powered Learning Content Creation: A Step-by-Step Guide
Discover how to streamline your course design with our step-by-step guide to AI-powered learning content creation, from multi-page paths to podcasts and video.
Discover how to streamline your course design with our step-by-step guide to AI-powered learning content creation, from multi-page paths to podcasts and video.

Create your own community, publish courses, engage members and generate recurring revenue - all from one platform.

Create courses, quizzes, podcasts and events with AI, and share them with your community on Learner Journey.
No credit card required. Free plan available.
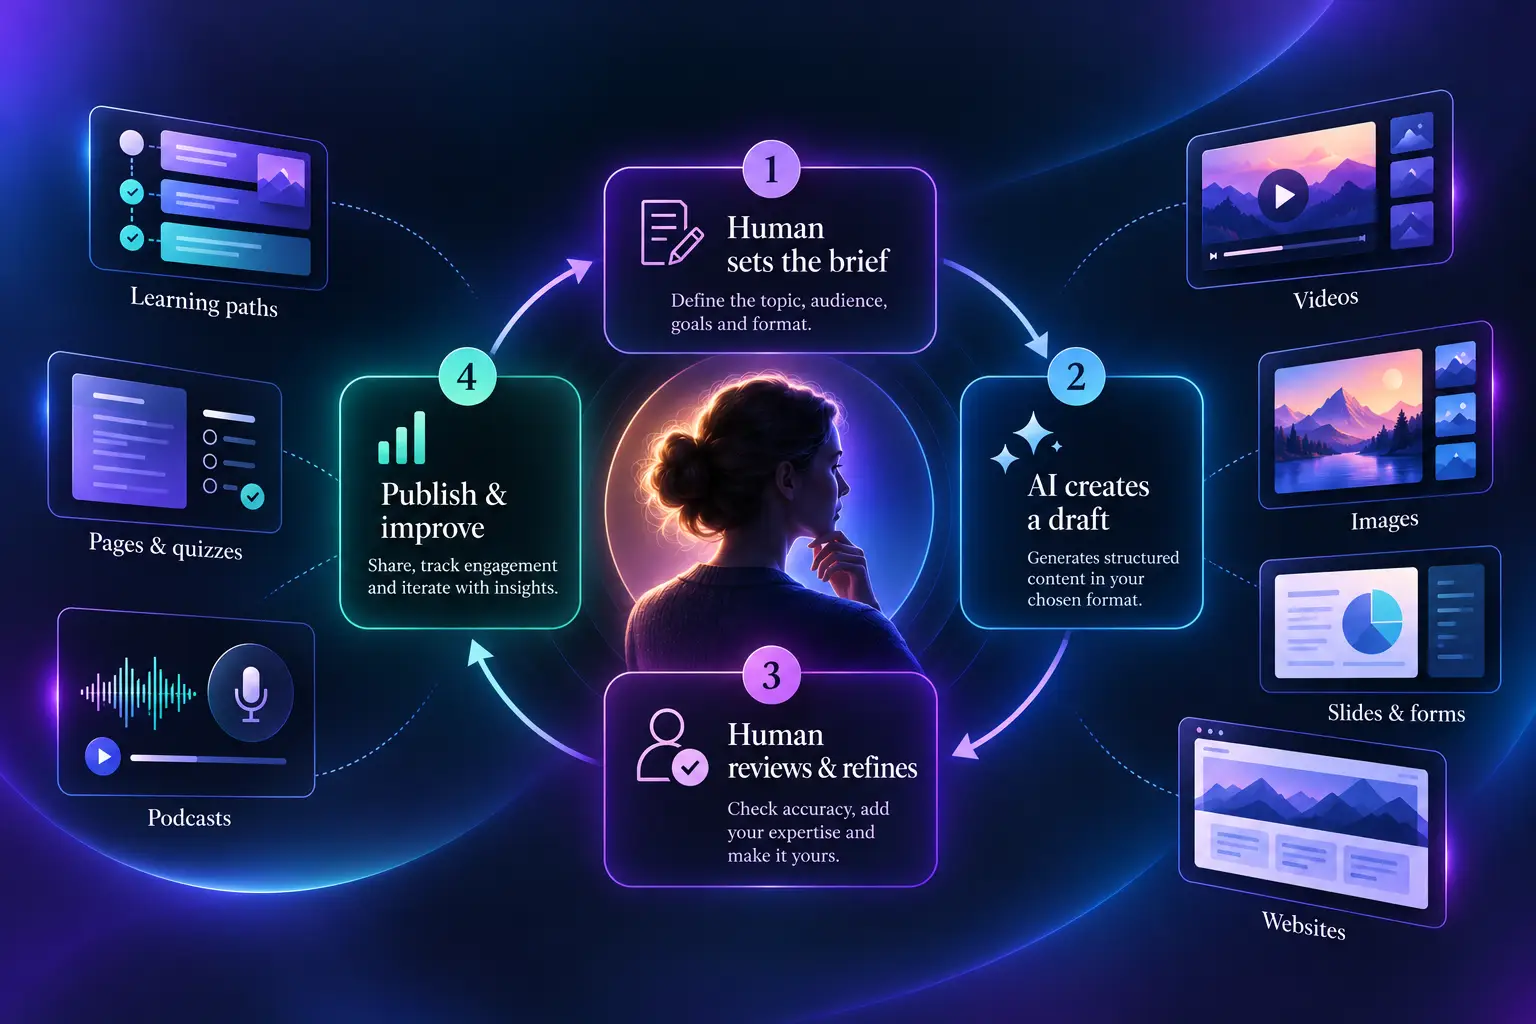
Creating good learning content used to mean juggling five or six tools: one for writing, one for slides, one for audio, one for video, one for images and another for the website your learners actually visit. Learner Journey puts all of that in one place, with AI built into each step. You stay in control, and the AI does the heavy lifting.
This guide walks you through each creative module step by step. For every step, we also explain what the software is doing behind the scenes, so you know what to expect, what you can change, and why some steps take a few seconds longer than others.
What you'll learn:
Before you start: workspaces and AI credits
Learning paths: a full multi-page course from one prompt
Learning pages: building and editing individual lessons
Podcasts: scripts, AI voices, music and audio editing
Video: recording, trimming and AI-written details
Video podcasts: putting the two together
Photos: AI image generation and photo editing
Building a website with AI
More creative tools: quizzes, slides, whiteboards, games, forms
Quick reference: what's free and what uses credits
Sign up at Learner Journey. No credit card is needed. Every new account comes with 400 AI credits so you can try the AI tools straight away. You also get 400 more credits for each person you invite who joins.
Want to try before you sign up? Visit Create your first lesson, quiz or course - free (
/create-free). Pick a content type, describe what you want, and click Sign Up & Generate. Once your account is created, the content is generated automatically, so you don't have to type your prompt again.
Every AI action has a small, fixed cost in credits, and many actions are completely free. Some examples of what's free:
Podcast scripts
AI voice generation
Cover images
Quiz and form generation
Learning-path outlines
Workspace themes
When an action does cost credits, the price is usually shown on the button before you click (for example Generate (35 credits)). If a generation fails, your credits are refunded automatically.
If you need more credits, Premium includes 2,000 a month and Pro includes 10,000 a month. You can also buy top-up packs at any time from Settings → Your Credits.
A workspace is your organisation's own space on Learner Journey, with its own members, branding and public website. Every account can create one workspace, and Pro accounts can create up to 20. You'll need a workspace to create learning paths and to build a website.
To create one: go to Workspaces → Create and follow the four steps:
Workspace Details: enter your name and URL, and choose privacy and how people register.
Workspace Purpose: pick a template that switches on the right modules for you.
Branding & Appearance: upload a logo, or click Generate Workspace Logo to have AI design one for free, then choose your theme colours.
Invite Members: optional; you can do this later.
A learning path is a sequence of lesson pages that a learner works through in order. It tracks their progress, and they get a certificate when they finish. With the AI Wizard, you can go from a single sentence to a complete multi-page course in a few minutes.
Go to Learning Paths → Create. You'll be asked "How would you like to create your learning path?"
Create with AI Wizard: describe a topic and let AI build the whole path.
Create Manually: assemble a path from pages you've already made.
Choose Create with AI Wizard.
Give the AI at least one source to work from:
What do you want to teach? For example, "A complete guide to modern JavaScript".
From a Webpage: paste a link to an article or existing resource.
Upload Document: a PDF, Word document or text file, such as a policy, a handbook or your own notes.
Next, open Defaults for All Pages to shape the content:
Default Blocks to Include: choose what goes on each page: AI-generated text, image, table, quiz or poll. Text and images are switched on by default.
Audience: Child, Teenager, Adult or Expert. For younger learners you can enter an exact age.
Writing Style (Formal, Informal or Neutral), Structure (Paragraphs, Bullet Points or Mixed) and Length.
Language: the content is written natively in the language you choose, rather than translated afterwards.
Learning Need Profile: ADHD, Dyslexia, Autism, Visual Impairment, English Language Learners, or Universal Design for Learning. The AI adapts its sentence length, layout and wording to suit the profile.
Finally, choose how many pages you want (3, 5, 7 or 10) and click Generate Outline.
How it works: at this stage the AI doesn't write the lessons yet. It reads your topic, web page or document and plans the course: a title, a short description, and a title for each page. Any web page or document you provide is treated as reference material only. Generating the outline is free.
On the Review & Configure Your Path screen you can:
Edit the path title and description.
Open any page and rewrite its title (this acts as the prompt for that page).
Change the blocks, audience, style, length or language for that page only. For example, you could add a quiz to the final page.
When you're happy, click Generate Learning Path.
You'll see a progress bar: "Generating page 1 of 5…".
How it works: first a cover image is created from your path title. Then each page is built one at a time. For every page, the AI writes the text, creates a matching image, and, if you asked for them, builds a quiz, a table or a poll. Each page is saved as a normal, fully editable page, and the pages are linked together in order to form your path.
If one page has a problem, the rest of the path still finishes. You'll be told which page is missing so you can add it from the path editor. If you try again, the pages that already worked aren't charged a second time.
When it's done, you're taken to your new learning path. From here you can:
Share it, and choose who can see it.
Export it as SCORM to use in another LMS.
Edit the path details, cover image and page order with drag and drop.
Turn on Charge for this path and set a one-off price or a monthly subscription. Learners pay securely through Stripe.
Learners click Enrol in this Path, follow Your Next Step, mark pages complete, and get a certificate at the end.
Every page in a learning path is a block-based page, made of text, images, tables, quizzes, polls and more. You can also create standalone pages.
Open the AI Page Wizard (or go to Create and choose Page).
Enter a Page Topic, or give it a document or web page to work from.
Under Include AI-Generated Blocks, choose the blocks you want, such as text, image, AI table, quiz or poll.
Click Generate Page.
How it works: the AI plans the page and then generates each block separately. The text is written for your audience, the image is created to match the content, quiz questions are generated from what the page teaches, and tables are filled with structured data. You land in the page editor with a complete first draft.
Every block is editable. You can rewrite the text, swap the image, regenerate a quiz, add rows to a table, drag blocks into a different order, or add new blocks. Use the AI Table block to create comparison tables from a short prompt such as "top 5 largest planets with diameter and moons". AI tables are free.
Learner Journey has a complete podcast studio. You can record your own voice, use realistic AI voices, generate background music, edit audio, and publish to Apple Podcasts and Spotify through an RSS feed.
Go to Podcasts and click Create a New Podcast.
Add a Title, Description and Category.
Add a Cover Image: either Upload your own, or click Generate and describe the look you want (for example "abstract audio waves, minimalist, blue and gold"). The AI cover is ready in about 10–20 seconds and is free.
Click Create Podcast.
On your podcast page, click Add Episode. An episode is made of segments, which are short audio clips played in order. You can mix and match segments from six sources.
This is the fastest way to produce a full episode.
Open the AI Script tab.
Enter a Podcast Topic or Prompt, or Upload a Document (PDF, Word or text).
Choose the Script Language, the Duration (about 2, 5 or 10 minutes), a Host Voice and a Guest Voice.
Click Generate Script.
How it works: the AI writes a natural dialogue between a host and a guest. It turns your topic or document into an engaging conversation, which works very well for turning dry policy documents into something people will actually listen to. You get an editable script, line by line, so you can fix facts and add your own phrasing. Script generation is free.
Click Generate All Audio. Each line is spoken by the voice you chose and added to the episode as its own segment.
Use this for narration, intros and summaries.
Open the TTS tab and type or paste your text.
Click the ✨ Enhance with AI button to polish the text.
Click 💡 Generate from Prompt to have AI write a short, medium or long script for you.
Choose a Language, a Voice (UK, US or Australian; standard or Elite HD; French and more) and a Tone: Neutral, Authoritative, Calm, Upbeat, Reflective or Encouraging.
Click Generate Audio, preview it, then click Add to Episode.
How it works: if your text is in a different language from the voice you choose, it's translated automatically before it's spoken. You can write in English and publish in French.
Record: click Record Voice Note to record straight from your browser's microphone.
Upload: add an existing MP3, WAV or WebM file.
How it works: once you add a recording, the AI transcribes it. If you haven't filled in the episode title and description yet, it writes them for you from the transcript. Transcription uses credits.
Open the Music tab and describe the music you want (for example "calm lo-fi piano intro"). Optionally, list anything to avoid.
Choose a length (5–30 seconds) and the fade in and fade out.
Click Generate music to get an original instrumental clip, ready to use as an intro, outro or transition.
Saved a great intro? Click the Save as reusable template icon on any segment. It then appears in the Templates tab for every future episode.
Each segment has an editing toolbar:
✏️ Edit text & regenerate audio: fix a word in an AI voice line and re-voice it.
✂️ Edit audio (trim, cut, fades): opens a waveform editor where you can drag the handles to trim the start and end, select and Remove a section (such as a cough or a long pause), and add fade in and fade out. Use Preview to listen, Undo cut or Revert to original if needed, then Apply.
Drag segments to reorder them.
How it works: the audio editor runs entirely in your browser, so it's instant and free. Your original file is kept, so you can always revert.
Add an Episode Title and Description, then publish the episode.
Learner Journey automatically stitches all your segments into a single MP3 file ready for podcast apps.
On your podcast page, click Publish to make the podcast public, then open the RSS Feed tab:
Copy Your RSS feed URL.
Fill in Feed settings (owner email, language and explicit content), which Apple and Spotify require.
Follow Submit to podcast apps to list your show.
The Analytics tab then shows you how your episodes are performing.
Go to Videos and click Create New Video Channel. Add a title, description and category, and either upload a cover image or Generate one with AI for free.
Click Add Video. You have three options:
Upload an existing video file.
Record Webcam: record yourself presenting straight from the browser.
Record Screen: capture a software demo, slides or a walkthrough.
Click Trim under the video preview.
Drag the start and end handles on the timeline, or type exact times in seconds.
Optionally add an audio fade in and fade out.
Click Preview to check it, then Apply.
How it works: your video is re-processed inside your browser, so nothing is uploaded until it's ready. Keep the tab open while you see "Processing… keep this tab open." Trimming is free, and you can trim again or Revert later from the video's menu, even after publishing.
Click Generate Details with AI.
How it works: the AI listens to your video, transcribes what's said, and then writes a clear title and description based on the content. No more staring at an empty title box.
Add an optional cover image (upload or AI-generated), choose whether to Enable Comments, and click Publish Video. Each video gets its own shareable public link, and your learners can watch the whole channel in full-screen Swipe Mode, a vertical, scrollable player that works brilliantly on phones.
Need a short visual to bring a lesson to life? In the page editor, the slide editor, posts and whiteboards, you'll find Generate AI Video. Describe a scene and the AI creates an 8-second, widescreen video clip. It can take up to a minute. This is the most powerful (and most credit-intensive) AI tool on the platform, so save it for moments that really matter.
Many creators now publish their podcast as a video as well. You can do this by combining the two studios:
Plan your episode with the podcast AI Script tab. Generate a host-and-guest conversation from your topic or document, and edit it into your running order.
Record the conversation on camera. In your video channel, click Add Video → Record Webcam (or Record Screen if you're presenting slides alongside it).
Trim the start and end, and add audio fades.
Click Generate Details with AI to get a title and description from what you actually said.
Publish the video to your channel. For the audio version, upload the same recording to your podcast as an episode segment, add an AI music intro, and publish it to Apple and Spotify through your RSS feed.
One recording gives you a video for your learners and a podcast for their commute.
The Photos library is where all your images live, and it has both an AI image generator and a photo editor built in.
Go to Photos and click Generate with AI.
Describe your image.
Choose a Style: Photo-realistic, Illustration, 3D render, Watercolour or Minimal.
Choose a Shape: Square, Landscape, Portrait, or a custom width and height.
Optionally add up to 4 reference images, for example your logo, a product photo or a style you like.
Choose a Model:
Nano Banana: great everyday images, the fastest option.
Nano Banana Pro: the sharpest detail and the best text inside images (useful for diagrams and posters).
ChatGPT Images: an alternative style from OpenAI.
Click Generate. If you don't love it, click Regenerate. When you do, click Save to library.
How it works: each model has a different strength. If your image needs readable words, such as a labelled diagram, a sign or a title, choose Nano Banana Pro, because it renders spelling far more reliably. The cost of each model is shown on the button before you generate.
Click Edit on any photo to open the photo editor.
Free manual tools:
Aspect ratio: crop to 1:1, 16:9, 9:16, 4:3 and more, ready for social media, slides or banners.
Zoom, rotate and flip.
Brightness, contrast and saturation.
Filters: B&W, Warm, Cool and Vintage.
Alt text: add a description so your images are accessible to screen-reader users.
AI Magic Edit: type an instruction such as "remove the background", "make it a sunny day" or "add a laptop on the desk", then click Generate Edit.
Anonymise faces: use the Blur faces preset to share classroom or event photos when you don't have consent to show people's faces. This is an important safeguarding tool for schools and training providers.
Click Save as New Photo when you're done. Your original is always kept.
Yes, you can build a complete, branded website on Learner Journey, with a homepage, supporting pages, navigation, your own colours and fonts, and even your own domain. Your courses, podcasts, videos and events can be embedded straight into it.
Your website lives in your workspace: go to Workspace Admin → Site. You'll see six tabs: Pages, Analytics, Navigation, Design, Domain and Build with AI.
On a brand-new site, you'll see "Build your site in minutes". Click Build with AI, then choose Build my whole site, which generates branding, a homepage and supporting pages from one prompt.
(On an existing site you can also Add a page with AI, Regenerate the homepage or Restyle the site.)
Option A: Describe it.
In Describe your site, write something like "A coaching academy for new managers — warm and professional, with courses, live events and a blog."
Optionally add your site type, audience, primary goal, name, brand colour, language and an accessibility profile, such as dyslexia-friendly or ADHD-friendly.
Optionally add reference material: up to 8 web pages and any documents. Then tell the AI how to use it:
Write it for me
Closely based on my content
Use my exact copy
Option B: Import an existing website.
Enter Your website address and click Find pages. Learner Journey crawls your current site and lists its pages.
Tick the pages you want to bring across, and optionally Match fonts & colours. Images are copied from your site rather than generated, which keeps costs down.
Click Generate blueprint.
How it works: the AI first produces a blueprint, a plan rather than a finished site. The blueprint includes your site name, tagline, brand colour, fonts and logo idea. It also lists every page, with its sections in order: hero banner, features, testimonials, FAQs, pricing, team, contact and more. The AI also knows what's already in your workspace, so it can place your existing learning paths, podcasts, video channels and events in the right sections. Drafting the blueprint costs about 2 credits.
Everything is editable before anything is built:
Change the site name and tagline.
Choose whether to keep your current workspace icon, generate a new one, or upload your own.
Choose whether to apply the generated colours and fonts or keep your existing ones.
Go through each page and edit its title, web address, and every section's heading and body text.
You'll see an estimate of the credits the build will use (mostly for images) and the reassurance "Nothing is published until you confirm." Click Build site (draft).
How it works: while you see "Building a private draft — your live site stays offline", Learner Journey creates your theme and logo and then builds each page in turn, generating images for the sections that need them. Every page is saved as a draft, so nothing changes on your live site yet.
Use the Live preview to click through your draft pages.
Not happy with a page? Regenerate it with a different tone: More formal, Warmer, More concise or More detail.
Tick the pages you want to Publish, and choose whether to Add to the navigation menu.
Click Publish. "Published! Your site is live."
Changed your mind? Revert homepage & branding undoes it in one click. Your previous homepage is always kept.
Open any page to edit it visually:
Add rows and sections, drag them to reorder, and adjust styles.
Preview in Desktop, Tablet and Mobile views.
Import page: pull the text and images from another web page or document.
Use Undo/Redo and History to go back to any earlier version. Changes autosave as you work.
The fastest way to edit is the Edit with AI chat panel. Just type what you want:
"Make the hero headline shorter and punchier." "Add an FAQ section about pricing." "Embed my Onboarding learning path below the introduction."
How it works: the AI reads your page, your brand voice and your workspace's content. It then proposes specific changes, which you preview before applying, and every change can be undone. Each message uses about 2 credits. Click Review page to get improvement suggestions.
On a page that's already live, your edits are staged as Unpublished changes. Visitors keep seeing the current version until you click Publish changes.
Navigation tab: build your menu with drop-down groups, choose your homepage, and pick a horizontal or sidebar menu.
Design tab:
Start from a starter theme, import the look of a website you like, or describe your brand and let AI create a theme.
Then fine-tune the colours, typography, header, background image (which AI can generate), buttons, corner radius, shadows, motion, announcement bar, favicon and footer.
Click Save current design as a theme to reuse it in other workspaces.
Domain tab:
Your site is available straight away on a free subdomain, with nothing to set up.
To use your own domain (for example academy.yourcompany.com), enter it and click Connect. Add the TXT record shown to your DNS settings, then click Check status. The badge moves from Pending DNS to Verified to Connected.
Each page can be set to Draft, Published, Unlisted (anyone with the link) or Members-only, so you can keep premium content behind a login.
Go to Create to generate almost any kind of content from a single prompt. Pick Page, Quiz, Learning Path, Assessment, Slides or Form, describe what you want, and click Generate. You can also:
📎 Attach a document to build from.
🎙️ Dictate your prompt instead of typing.
⚙️ Set the audience, learner profile, language, writing style, length and number of questions, slides or pages.
Describe a topic or upload a document. The AI writes multiple-choice questions that match your audience and any learning needs, and creates a cover image too. Assessments are generated as editable text blocks, ready for you to refine.
Choose Slides, describe your presentation, and pick 3–20 slides. The AI writes the content of every slide and then generates a matching image for each one, before opening the deck in the slide editor.
Open a Whiteboard and use the AI menu:
Generate diagram: turn a topic, document or web page into a mind map, flowchart, concept map, decision tree, timeline or SWOT matrix. You can choose the style, from hand-drawn to colourful to monochrome.
Draw with AI: describe a sketch and the AI draws it.
Generate text, image, video or music, straight onto the board.
How it works: diagrams and AI drawings are created as real whiteboard shapes rather than flat pictures, so you can move, recolour, resize and edit every box and arrow afterwards. Each one costs just 2 credits. You can embed your own videos and podcast episodes on the board, then Export it as a PNG or SVG.
Turn any quiz or assessment into a game in seconds:
Go to Games → Create and pick a game type: Match & Memory, Runner Answer Gates, Quiz Snake, Quiz Pong or Knowledge Defender.
Choose a quiz or assessment as the question source.
Set the mode (Practice, Timed or Challenge) and the difficulty.
Click Create Game.
Games use your existing questions, so they cost no AI credits at all.
In the form builder, use the AI-Powered Generator: "Describe the form you want, and let AI build it for you." For example: "A course feedback form with a 1–5 rating, what they liked, and what could be improved." You can then adjust the fields, turn on email notifications and add a spam-prevention question.
Free, no credits used | Low cost (~2 credits) | Image (35, or 120 for premium models) | Higher cost |
|---|---|---|---|
Learning-path outlines | Each AI text block on a page | AI image generation (Nano Banana) | Voice transcription (80) |
Podcast scripts | Website blueprint | AI Magic Edit for photos | AI music clip (60) |
AI voice generation | "Edit with AI" chat messages | Page, slide and section images | AI video clip (1,200) |
All cover images | Theme from brief or website | ||
Quizzes, polls, AI tables | Whiteboard diagrams and AI drawings | ||
Assessments and forms | |||
Workspace logo and theme | |||
Audio trimming, video trimming, manual photo edits | |||
Learning games |
Credit costs are correct at the time of writing and are always shown in the app before you generate. Failed generations are refunded automatically.
With 400 free credits and no card needed, you can build your first learning path, record a podcast episode, design your images and launch a website today.
The top membership management platforms for 2027. Learn how connecting subscriptions, CPD tracking, and AI-powered learning transforms member engagement
How mandatory training tracking software is helping schools, employers and compliance teams stay organised and reduce administration.